A duct camera inspection sends a small video probe through your HVAC ductwork to show, in real time, what’s actually inside: dust buildup, mould, disconnected joints, or a dead rodent blocking a supply run. It’s the diagnostic step that turns guesswork into evidence, whether you’re deciding if cleaning is worth the money or verifying a job was done properly. It typically makes sense when you notice uneven airflow, a musty smell, or you’re weighing a cleaning quote after a renovation.
TL;DR:
- Camera inspections are most beneficial before duct cleaning, to verify the need for service rather than assuming dust alone indicates a problem.
- Proper equipment, including cable length, LED lighting, and articulation, is essential for detecting issues like disconnected joints or mold hidden inside ductwork.
- Inspections should include documented footage, still images, and location notes, with longer cables and commercial-grade tools necessary for larger or complex systems.
- Visual findings like mold or disconnected joints require pairing with airflow or pressure tests to accurately assess air loss and system efficiency.
- Choose technicians who share actual inspection footage, provide detailed written reports, and have experience with the specific equipment for reliable results.
Table of Contents
- How does a duct camera inspection work?
- When should you book a camera inspection?
- What equipment separates a good inspection from a rushed one?
- What happens during a professional camera inspection?
- How do you read the results of a duct inspection?
- How do you choose a technician for a camera inspection?
- How Blue Brothers approaches duct camera inspections
- The gap between what a camera shows and what people assume it proves
- Ready to book a duct camera inspection?
- Sources
- FAQ
How does a duct camera inspection work?
Technicians feed a camera through your ductwork using one of three setups: a push rod camera for straight residential runs, a flexible borescope for tighter bends, or a small-diameter camera built for narrow supply lines. Each reaches different parts of the system. A push rod handles most single-family homes, while commercial systems with longer trunks or multiple floors often call for a longer, more manoeuvrable rig.
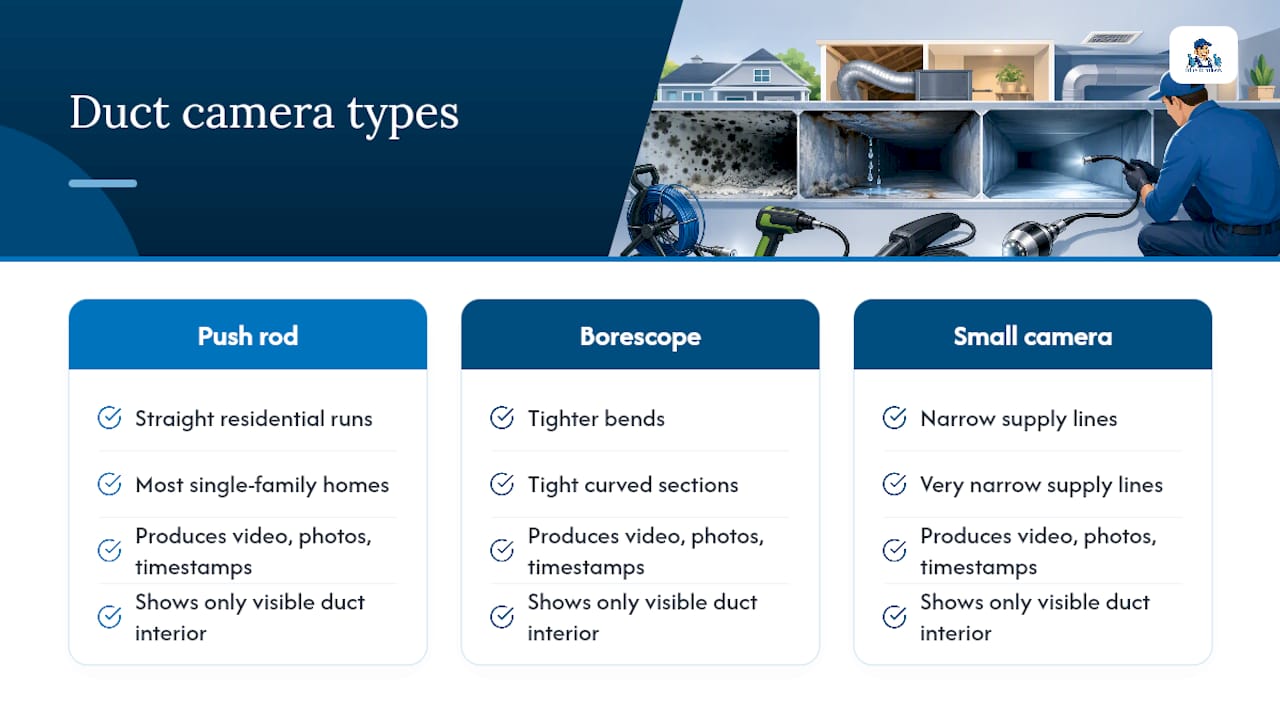
What you get back matters as much as the inspection itself. A properly run job produces recorded video, still photos at key points, and time stamps that document conditions before and after any work. NADCA’s guidance for technicians notes that a good quality inspection camera lets you see inside ducts without dismantling anything, which is exactly why footage has become standard documentation in professional duct work.
Here’s the limitation worth knowing upfront: a camera shows you what’s visible inside the duct. It won’t detect a leak hidden behind drywall or inside an unreachable joint. Camera inspection is a diagnostic tool, not a cleaning action. It tells you where the problem is; it doesn’t fix anything.
When should you book a camera inspection?
Some signs point clearly to booking an inspection rather than waiting it out. Others are softer calls where a camera inspection helps you decide between monitoring the system and calling a technician.
- Uneven temperatures between rooms served by the same HVAC system
- Visible dust or debris blowing out of registers
- A persistent musty or mildew smell near vents
- Signs of pest activity, like scratching sounds or droppings near ducts
- Airflow problems that have lingered for months despite filter changes
Beyond symptoms, there are situations where an inspection is simply good practice: before paying for cleaning (to verify it’s actually needed), after a renovation disturbed ductwork, before reconnecting old ducts in a newly purchased home, or after a suspected blockage. If your energy bills have crept up and you suspect duct efficiency losses, pair the camera work with a pressure or airflow test. A camera can show a disconnected joint, but only a pressure test quantifies how much air you’re actually losing.
What equipment separates a good inspection from a rushed one?
Not all inspection gear is built the same, and the differences show up in what a technician can actually find. The specs that matter most:
- Cable or insertion length: typically 20 to 45 feet for residential-grade tools, with longer cables needed for commercial or multi-storey buildings
- Camera head diameter: smaller heads navigate tighter supply runs without getting stuck
- LED lighting: brighter, adjustable lighting reveals mould and debris that dim lighting hides
- Articulation or rotation: the ability to angle the camera head at bends and junctions
- Monitor and recording capability: a live screen for on-site viewing, plus saved footage for the report
- Battery life: matters more on larger commercial jobs that run for hours
Pro Tip: Ask whether the system includes an electronic footage counter. Without one, a technician can only estimate how far into the duct a problem sits, which makes follow-up repairs harder to pinpoint.
A 45-foot cable covers most single-family homes comfortably. Complex attic runs, long commercial trunks, or multi-unit buildings often need a longer cable or a service built specifically for commercial-scale ductwork. Whatever the setup, a proper report should include time-stamped images, written notes on location (floor, room, register ID), and clear annotations, not just a folder of unlabelled clips.
What happens during a professional camera inspection?
The process is straightforward, but the sequence matters for getting useful results.
- Access preparation: the technician locates and opens access points, usually at the furnace, main trunk, or select registers, and confirms the system is powered down where needed for safety.
- Live insertion: the camera goes in gradually, with the technician watching a monitor in real time and stopping at bends, joints, and visible buildup.
- Targeted capture: at each notable point, the technician captures still images and marks the location, rather than just running continuous video.
- Review and reporting: findings get compiled into a short written summary alongside the footage, with recommended next steps.
A typical residential inspection runs 30 to 60 minutes depending on how many runs need checking. You should walk away with recorded video, annotated stills, and a written summary, not just a verbal “it looks dirty.”
How do you read the results of a duct inspection?
Not every finding carries the same urgency, and knowing the difference saves you from either overreacting or ignoring something serious.
Dust and light debris are the most common finding and usually point to routine cleaning rather than an emergency. Mould growth is a different category entirely. It signals moisture intrusion somewhere in the system and should move to the top of your list, both for health reasons and because it tends to spread once established. Disconnected joints show up more often than most homeowners expect, especially in older homes or after renovation work, and they quietly leak conditioned air the whole time they go unnoticed. Obstructions, whether from collapsed insulation, pest nests, or construction debris, explain a lot of the “one room never gets warm” complaints. Dryer lint inside a duct or vent line is its own priority category: it’s a documented fire risk and shouldn’t wait for your next routine cleaning cycle.
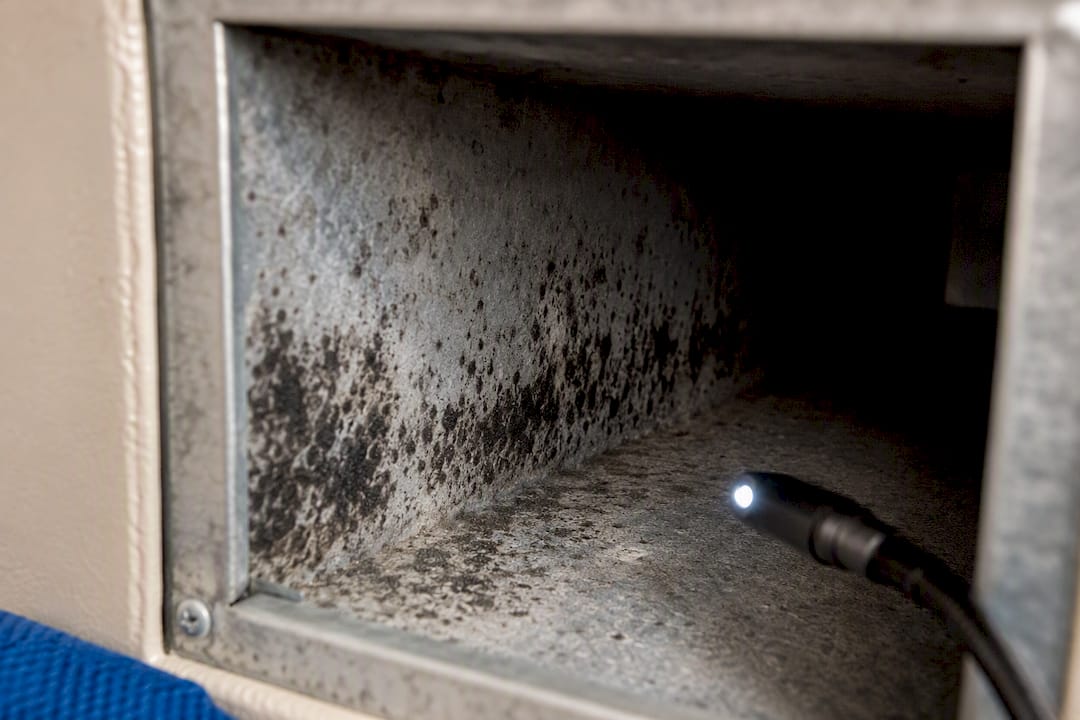
Camera footage alone won’t catch every leak. The EnergyStar duct sealing guidance notes that leaky ducts can account for a substantial share of the air moving through a forced-air system, and much of that loss happens at joints and seams a camera can’t always see clearly from inside. Pairing the visual inspection with a pressure or airflow test is the only way to catch leaks that are invisible on camera but still costing you money every month.
How do you choose a technician for a camera inspection?
The gap between a useful inspection and a wasted appointment usually comes down to who’s holding the camera. A few concrete things to check before booking:
- Ask to see a sample report from a previous job, not just a sales brochure.
- Confirm the technician has direct experience running camera inspections, not just general duct cleaning.
- Check for proof of insurance and any local licensing that applies in your area.
- Ask directly: what equipment do you use, and is the camera inspection included with cleaning or billed as a separate line item?
- Ask how long the inspection typically takes for a home your size.
Pro Tip: If a technician can’t or won’t show you actual footage from your own job before quoting repair work, treat that as a warning sign, not a formality.
Red flags are usually easy to spot once you know to look: refusal to share footage, no written report at the end, or a hard upsell pitch made without showing you any actual evidence from your ducts. A technician confident in their findings will show you the video without hesitation.
How Blue Brothers approaches duct camera inspections
Some companies treat the camera inspection as the starting point for any duct or dryer vent job, not an afterthought tacked onto a cleaning quote. The approach centres on documenting actual conditions with time-stamped photos and video, which creates a before-and-after record clients can review rather than take on faith. That documentation shapes which areas get prioritised first, whether that’s a mould-prone section, a dryer vent lint buildup, or a disconnected joint losing conditioned air. For homeowners and commercial clients alike, seeing the footage removes the guesswork from deciding what actually needs attention. It’s also the kind of record property managers appreciate when reporting maintenance work to owners or tenants.
The gap between what a camera shows and what people assume it proves
Here’s what the conventional advice gets wrong: a lot of duct cleaning marketing treats the camera as proof that a full cleaning job is justified, when really it’s proof of what the technician can see from inside the pipe. Those are different things. A duct can look moderately dusty on camera and still be losing 20% of your conditioned air through joints the lens never passes. Treating the footage as the complete picture, rather than one piece of it, is the most common mistake I see homeowners make when reading an inspection report.
My take: prioritise the footage that shows something actionable, mould, a disconnected joint, dryer lint, over footage that just confirms “yes, there’s some dust in there.” Dust is normal. It’s rarely urgent on its own. What should move you to book service is anything tied to air loss, fire risk, or moisture. And if a report doesn’t pair visual findings with some mention of airflow or pressure, ask why not. A camera tells you where to look next, not the whole story.
— Jayce
Ready to book a duct camera inspection?
Some providers build the camera inspection into their duct and dryer vent cleaning visits, providing time-stamped video and a written report as part of the job, not as an upsell afterward. That means you see exactly what the technician sees before any cleaning decision gets made, with clear, upfront pricing and no surprise line items.
Before you book, have a few details ready: roughly how large your home is, any symptoms you’ve noticed (odours, uneven airflow, recent renovation work), and a couple of preferred dates. If dryer lint or fire risk is a concern, mention it directly, since that often gets scheduled alongside the duct work. Start with the air duct cleaning service page to see what’s included, or check the dryer vent cleaning page if lint buildup is your main worry. Technicians often handle these jobs, and pricing is typically provided before work begins.
Sources
This article draws on NADCA’s guidance for duct inspection technicians, the EPA’s overview of air duct health considerations, and EnergyStar’s HVAC duct sealing fact sheet. Readers interested in the broader indoor air quality context can also visit the GreenLearn blog.
FAQ
How do you inspect ductwork?
A technician inserts a video camera, mounted on a push rod or flexible borescope, through access points at the furnace or registers, then watches a live monitor while capturing photos and video at bends, joints, and visible buildup. The result is a documented visual record rather than a guess based on airflow symptoms alone.
What is the 2-foot rule for ductwork?
This term generally refers to duct sizing and spacing guidelines used during installation, not to camera inspection procedures. If you’ve seen it referenced in relation to duct inspection, it likely relates to installation clearance standards rather than a formal inspection rule, so confirm the specific context with your technician.
How much does it cost to have a camera put down a drain or duct?
Pricing depends on home size, duct accessibility, and whether the inspection is bundled with cleaning. Bluebrothers includes camera documentation as part of its air duct cleaning service, which runs $400 to $800 CAD depending on scope, so ask for a quote based on your specific home.
What is a camera inspection?
A camera inspection is a diagnostic process that uses a small video probe to show the inside condition of ducts, pipes, or vents without dismantling the system. It’s used to document conditions and prioritise repairs rather than to perform any cleaning or repair itself.