If your dryer runs but clothes come out damp, restricted venting is the most common culprit, followed by a clogged lint screen, the wrong cycle setting, or dirty moisture sensors. A warm drum with damp clothes points to airflow first; a cold drum means it’s time for heat and power checks, and possibly a technician.
TL;DR:
- Restricted venting is the leading cause of long dry times, with every 90-degree elbow adding resistance comparable to several feet of straight pipe.
- Dirty moisture sensors and lint buildup can cause cycles to end early, especially if sensors are coated with residue from dryer sheets and softeners.
- Ensuring the dryer has proper power and heat, especially on electric models, is crucial, as a tripped breaker or gas supply issues can mimic vent problems.
- Regularly cleaning the lint screen, washing sensor bars, and checking the vent hose can significantly improve drying performance and reduce fire hazards.
- When DIY efforts fail to improve drying times, professional vent cleaning is recommended to clear deep buildup in inaccessible wall or roof sections.
Table of Contents
- Dryer not drying clothes? 10-minute quick checklist
- Why airflow problems are the real cause of long dry times
- Are your lint traps and moisture sensors causing early shutoffs?
- How to tell if your dryer is actually heating properly
- Loading and cycle mistakes that mimic a broken dryer
- How to clean your dryer vent safely, step by step
- When it’s time to call a professional vent technician
- Checking the dryer belt for wear and slipping
- Signs your heating element is failing
- Testing the thermostat and thermal fuse
- Checking the high-limit thermostat and thermal cutoff
- Verifying your outlet and voltage supply
- Gas dryer specific: checking the gas valve coils
- What routine dryer maintenance actually saves you
- Book a professional dryer vent cleaning with Blue Brothers
- Sources
- FAQ
Dryer not drying clothes? 10-minute quick checklist
Work through these in order before assuming the worst. Most dryer-not-drying complaints get solved in this exact sequence.
- Clean the lint screen. Pull it out, peel off the mat of lint by hand, and check that no film remains when you run your finger across the mesh.
- Confirm your cycle. Make sure you’re not stuck on Air Fluff, Eco, or a no-heat setting. Eco modes intentionally cut back on heat to save energy, which stretches drying time considerably.
- Run a 5-minute heat test. Start an empty cycle and open the door partway through. You want to feel real heat, not warm air that fades fast.
- Check the vent hose behind the dryer. Pull the machine out and look for kinks, crushing, or a hose that’s popped loose.
- Test your washer’s spin extraction. Wring a damp garment straight from the washer. If water runs out easily, your washer isn’t spinning out enough moisture before the dryer even starts.
If all five check out clean and the dryer still runs long, the problem lives deeper in the vent system or the machine itself.
Why airflow problems are the real cause of long dry times
A dryer doesn’t dry clothes with heat alone. It relies on a steady stream of air pulling moisture out through the exhaust duct and outside. Block that airflow and the drum fills with humid air that just gets recirculated, so clothes stay damp no matter how hot the element runs. This is exactly why manufacturer support pages consistently flag restricted venting as the leading cause of dryers that heat but still leave laundry wet.
Vent length and shape matter more than most homeowners realize. Every 90 degree elbow in your ductwork adds resistance roughly equivalent to several feet of straight pipe, and manufacturers publish maximum equivalent vent lengths for exactly this reason. Following those rigid metal duct specifications instead of using flexible foil or plastic accordion hose makes a measurable difference in dry times.
Signs of a clogged dryer vent to watch for:
- Clothes are hot to the touch but still damp at the end of a cycle
- The outside of the dryer feels unusually warm during operation
- The exterior vent hood flap barely moves, or doesn’t move at all, when the dryer runs
- A burning or musty smell shows up partway through a cycle
- Drying times have crept up gradually over months, not suddenly
Quick airflow test: with the dryer running, step outside and hold your hand near the exterior vent hood. Weak or barely-there airflow is a strong sign of a partial or full blockage somewhere in the duct run.
Are your lint traps and moisture sensors causing early shutoffs?
Lint doesn’t stop at the screen. A film of residue, often from dryer sheets and fabric softener, builds up on the mesh and on the metal moisture sensor bars just past the lint trap opening. Those sensor strips read how much moisture is left in the load and cut the cycle short once they detect “dry,” so a dirty sensor can end a cycle while towels and jeans are still noticeably damp.
How to clean sensors and traps properly:
- Wash the lint screen in warm soapy water every few weeks to strip residue the vacuum can’t reach
- Wipe the metal sensor bars inside the lint trap housing with a cloth dampened in isopropyl alcohol
- Vacuum the lint trap housing itself, not just the screen slot, using a narrow nozzle attachment
- Repeat sensor cleaning monthly if you use dryer sheets regularly
Pro Tip: If your dryer stops early on heavier loads like towels but seems fine on light loads, that’s a classic sign of dirty moisture sensors rather than a heating problem. Cleaning the sensor bars usually fixes it in minutes.
How to tell if your dryer is actually heating properly
Before assuming your dryer needs a repair, rule out the simple stuff.
- Run an empty load on a normal heated cycle for five minutes, then open the door and feel inside. You should feel genuine warmth, not a faint trace of it.
- On electric models, check your breaker panel. Electric dryers run on a 240 volt double-pole breaker, and if one side has tripped, the dryer will still tumble and run but produce only weak or no heat.
- On gas models, confirm the gas supply valve behind the dryer is fully open. Don’t attempt any burner or gas valve repair yourself. That’s a job for a licensed technician.
- If heat is still absent or inconsistent after these checks, write down your model and serial number along with what you’ve already tried, and book a service call.
Loading and cycle mistakes that mimic a broken dryer
A surprising number of “broken dryer” calls turn out to be loading habits. Clothes need room to tumble freely so air can actually reach every surface.
- Fill the drum to roughly one-half to three-quarters capacity. Anything more and clothes just clump together
- Dry similar fabric weights together. Bath towels and bedsheets take much longer than t-shirts, so mixing them means one or the other finishes wrong
- Use timed dry instead of sensor dry for very small loads, single bulky items like a comforter, or mixed-weight loads the sensor struggles to read accurately
- Bump up your washer’s spin speed if your machine allows it. Less residual water going in means less work for the dryer
Energy-efficiency guidance backs this up directly: overloading and mismatched loads are named as common, avoidable drags on drying performance.
How to clean your dryer vent safely, step by step
If the quick checklist pointed to airflow, here’s the safe way to clear it yourself.
- Unplug the dryer, or on gas models, shut off the gas supply valve before you touch any venting.
- Pull the dryer away from the wall and disconnect the vent hose at the back. Check inside it for kinks, crushing, or, in older homes, signs of rodent nesting.
- Use a vacuum with a hose attachment and a dryer-vent brush kit to clear lint from the dryer’s exhaust port and the wall duct, then head outside and clean out the exterior hood.
- Reconnect everything, run an empty heated cycle, and check airflow at the outside vent. This exact unplug, disconnect, vacuum, and test sequence is what manufacturer guides recommend for a reason: it’s simple, and it works for most straightforward runs.
Short, straight vent runs with easy exterior access are reasonable DIY territory. Long runs with multiple elbows or a roof termination are a different story, covered next.
When it’s time to call a professional vent technician
Some jobs aren’t worth doing yourself, and some symptoms are warning signs, not inconveniences.
- Long dry times persist even after you’ve cleaned the lint trap and the accessible vent sections
- The dryer displays an error code, produces no heat at all, or makes new grinding or squealing noises
- You smell burning, which needs immediate attention given how blocked vents contribute to dryer fires
- Your vent run is long, has several elbows, or exits through a roof or crawlspace where DIY tools can’t reach
Before you call, gather your model and serial number, a description of the symptoms, what you’ve already tried, and a rough sense of your vent’s length and number of elbows. Whether it exits through a wall or a roof matters too. Manufacturers note that collecting this information upfront speeds up diagnosis considerably and can shave time, and sometimes cost, off the service call. A professional can also access wall cavities and roof terminations a homeowner simply can’t reach, which matters when fire risk is on the table.
Checking the dryer belt for wear and slipping
If your dryer tumbles slowly, makes a slapping or squealing noise, or the drum doesn’t turn at all while the motor still hums, the belt is a likely suspect. The belt wraps around the drum and connects to the motor pulley, and years of heat cycling eventually cause it to crack, fray, or stretch loose.
A worn belt often shows visible cracking along its ribbed surface, or you’ll notice the drum turning unevenly, catching and jerking rather than rotating smoothly. In more advanced cases, the belt snaps entirely. The drum stops turning completely while the motor keeps running, sometimes accompanied by a burning rubber smell.
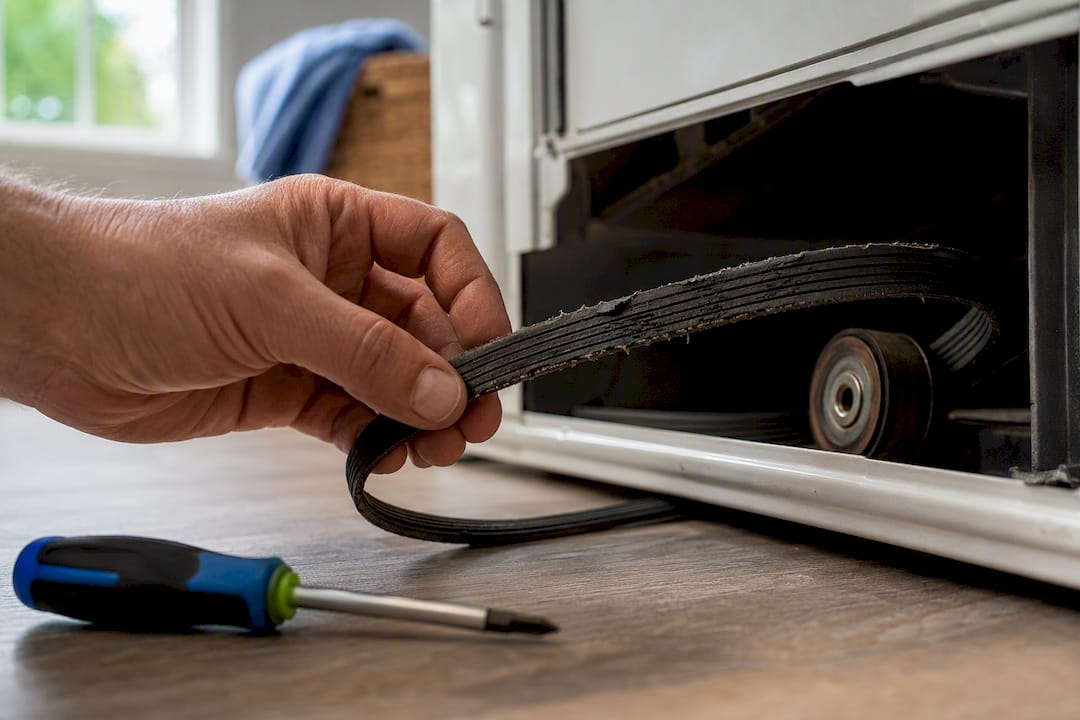
Replacing a dryer belt means removing the front or top panel, depending on the model, to access the drum and motor assembly. It’s a doable repair for a comfortable DIY homeowner with the right replacement part number in hand, but it does involve partially disassembling the machine. If you’re not confident pulling panels and reseating a drum, this is a reasonable one to hand off to a technician, especially since a belt that’s slipping can sometimes mask or mimic other problems, like a failing idler pulley or worn drum support rollers, that are harder to diagnose without the cabinet open.
If your dryer is tumbling fine but just isn’t producing enough heat, the belt isn’t your problem. Move on to the heating element instead.
Signs your heating element is failing
The heating element is the coil that actually warms the air moving through the drum. When it fails, the classic symptom is a dryer that runs, tumbles normally, and even completes a full cycle length, but clothes come out cold and just as wet as when they went in.
A partially failing element behaves differently than a fully dead one. You might notice cycles that used to take 40 minutes now stretching to 90 or more, with the dryer producing some heat but never quite enough. A completely burned-out element, on the other hand, gives you no warmth at all, even on a high-heat cycle setting.
Electric dryers use a coiled wire element that can develop a break or burn-out point over years of use, particularly in units running eight or more years. Gas dryers don’t have this element at all. Heat comes from the burner assembly instead, so if you have a gas dryer, a “no heat” problem points toward the igniter or gas valve rather than an electric heating coil.
Testing an element properly requires a multimeter to check for continuity, since a visual inspection alone often misses a break hidden inside the coil housing. This is one of the areas where a technician’s diagnostic tools save real guesswork, particularly because a failing element and a failing thermostat can produce nearly identical symptoms.
Testing the thermostat and thermal fuse
Dryers use more than one thermostat to regulate temperature, and a fault in any of them can cause anything from no heat to a dryer that overheats and shuts down mid-cycle. The cycling thermostat regulates normal operating temperature throughout a cycle, turning the element on and off to hold a steady range.
The thermal fuse is a separate, one-time safety component. It’s designed to blow permanently if the dryer overheats, usually because of restricted airflow forcing internal temperatures higher than the system is built for. Once a thermal fuse blows, it does not reset. It has to be physically replaced, and it will blow again immediately if the underlying airflow restriction that caused it isn’t fixed first.
This is worth sitting with for a second: a blown thermal fuse is very often a symptom of a clogged vent, not a random electrical failure. Replacing the fuse without clearing the vent almost guarantees you’ll be replacing it again within weeks. If your dryer produces no heat whatsoever and the drum still tumbles, a blown thermal fuse combined with a restricted vent is one of the most common combinations technicians see.
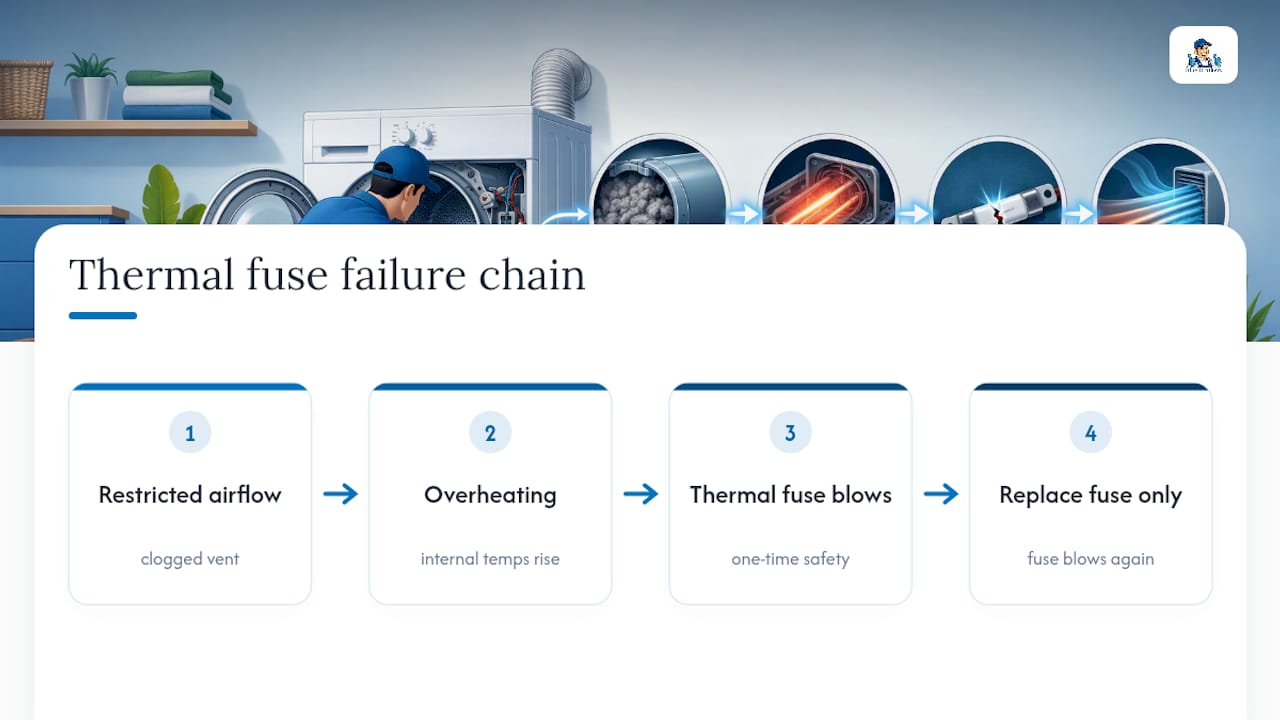
Testing either component requires a multimeter and some comfort working inside the cabinet. If you’re not familiar with continuity testing, this is a reasonable point to bring in a technician rather than guess.
Checking the high-limit thermostat and thermal cutoff
The high-limit thermostat sits close to the heating element and acts as a second layer of protection beyond the thermal fuse. Where the fuse is a permanent, one-use safety device, the high-limit thermostat can trip and reset on its own once temperatures drop back to a safe range, cutting power to the element temporarily if the dryer starts running hotter than it should.
A dryer that cycles between hot and no heat repeatedly within a single load, rather than staying consistently warm or consistently cold, often points to a high-limit thermostat tripping on and off. That’s different from a completely dead element or a blown fuse, both of which produce a flat, unchanging “no heat” result.
Like the thermal fuse, a high-limit thermostat that trips repeatedly is usually reacting to a real problem, typically restricted airflow pushing internal temperatures too high, rather than failing on its own for no reason. Testing both components together with a multimeter, while also checking that the vent is clear, gives a much more reliable diagnosis than replacing parts one at a time and hoping.
Verifying your outlet and voltage supply
Electric dryers need a dedicated 240 volt circuit to run their heating element properly, and a supply problem here produces a specific, recognizable symptom: the dryer tumbles, the timer advances, the cycle completes, but there’s little to no heat.
This happens when one leg of a double-pole 240 volt circuit loses power while the other stays live. The dryer’s motor and controls often run fine on the remaining 120 volts, so the machine looks like it’s working normally from the outside, but the element never gets the full voltage it needs to heat properly. Check your breaker panel for a tripped or partially tripped breaker, and confirm both halves of a double-pole breaker are firmly in the “on” position.
Older three-prong outlets and newer four-prong outlets wire differently, and a loose or corroded connection at the outlet or the dryer’s terminal block can cause the same partial-power symptom. Burn marks, a scorched smell, or a plug that feels loose in the outlet are signs the connection itself needs attention from a licensed electrician, not just the dryer. Never attempt to rewire a dryer cord or outlet yourself if you’re not familiar with 240 volt household wiring. This is genuinely one area where the wrong DIY move creates a fire hazard rather than fixing one.
Gas dryer specific: checking the gas valve coils
Gas dryers rely on a set of solenoid coils on the gas valve to open the flow of gas to the burner once the igniter has heated up enough. If one or more of these coils fails, the valve never fully opens, and you get a dryer that tumbles, runs its full cycle, and produces no heat at all, very similar to what you’d see with a failed electric heating element.
A useful diagnostic clue: if you can hear or see the igniter glowing and cycling on and off repeatedly without ever catching a flame, that points toward a gas valve coil problem rather than an igniter failure. The igniter is doing its job, but the valve isn’t responding by releasing gas.
This is not a DIY repair. Gas valve components involve both electrical current and a live gas line, and testing or replacing them without proper training and equipment is a genuine safety hazard. If your gas dryer isn’t producing heat and you’ve already ruled out venting, sensors, and the power supply to the control board, this is the point where you call a licensed gas appliance technician rather than reaching for a screwdriver.
What routine dryer maintenance actually saves you
Cleaning the lint screen after every load and checking the vent once a year sounds almost too basic to matter, but it’s the single habit that prevents most of the problems covered here from ever developing. A clear vent means shorter cycles, lower energy bills, and a heating element that isn’t working overtime to compensate for trapped humid air. Professional vent cleaning goes further, clearing lint that builds up in wall cavities and roof terminations DIY tools can’t reach, which improves both drying performance and indoor air quality. None of this is complicated. It’s just consistently overlooked until a dryer stops working properly.
— Jayce
Book a professional dryer vent cleaning with Blue Brothers
Sometimes you clean the lint trap, clear the visible hose, run the heat test, and the dryer still runs long. That usually means lint has built up deeper in the ductwork, in a wall cavity, an elbow joint, or a roof termination that a vacuum hose just can’t reach.

Professional technicians handle exactly that kind of job in various regions. Our technicians clean the full duct run from the dryer connection to the exterior termination, using equipment built to reach the sections homeowners can’t get to safely on their own. Beyond faster dry times, a properly cleared vent lowers fire risk and cuts down on the lint and humid air circulating back into your home. We offer free quotes, so if your dryer’s been running long even after you’ve worked through the basics, it’s worth finding out what a professional cleaning actually costs before you replace parts or a whole machine. Get a free quote for residential dryer vent cleaning and find out if your vent is the real problem.
Sources
For cleaning frequency and manufacturer troubleshooting steps, Natural Resources Canada’s dryer efficiency guidance and Whirlpool’s product support offer the most reliable, manufacturer-backed reference points for homeowners troubleshooting long dry times.
- Dryer is not drying or experiencing long dry times – Product Help | Whirlpool
- Dryer – Not Drying and Extended Drying Time – Electrolux support
- How to clean a dryer vent from inside and outside — Whirlpool blog
FAQ
How do you fix a dryer that is not drying?
Start by cleaning the lint screen, confirming you’re not on an Air Fluff or Eco setting, and checking the vent hose for kinks or blockages. If the dryer heats but clothes stay damp, the vent is the most likely cause; if there’s no heat at all, check your breaker or gas supply next.
Why are my clothes still damp after drying?
Damp clothes after a full cycle usually point to restricted airflow trapping humid air inside the drum, though dirty moisture sensors and overloaded loads cause the same symptom. Run a heat test and check the outside vent hood for airflow to narrow it down.
What are the signs of a dying dryer?
Watch for gradually increasing dry times, a burning smell, unusual grinding or squealing noises, cycles ending with heavier items still wet, or the dryer producing heat inconsistently. Any burning smell warrants immediate attention given the fire risk tied to blocked vents.
How do I know if my dryer vent is clogged?
Clothes that are hot but damp, a warm dryer exterior, weak or no airflow at the outside vent hood, and gradually lengthening cycle times all point to a clogged vent. A quick outdoor airflow check while the dryer runs is the fastest way to confirm it.