Negative air duct cleaning is a source removal method that uses a powerful vacuum to pull air and loosened debris out of the ductwork while technicians agitate the interior surfaces. It’s most valuable for mold contamination, heavy debris or construction dust, and commercial or hard to reach trunk systems where ordinary brushing cannot reach. The benefits depend entirely on proper containment and following a recognized procedure.
TL;DR:
- Negative air duct cleaning is most effective for visible mold, heavy debris, or moisture damage, especially in commercial or hard-to-reach systems.
- Proper containment, continuous negative pressure, and HEPA filtration are essential components to ensure the job actually improves air quality.
- Duct material type influences safety: flexible ducts risk collapse under high pressure, and fiberglass liners can be damaged by aggressive agitation.
- Industry standards like NADCA ACR require verification measures such as pressure checks and documented cleanliness to avoid ineffective cleaning.
- An initial inspection helps determine whether duct cleaning is necessary or if less invasive services suffice, saving costs and preventing unnecessary work.
Table of Contents
- How negative pressure duct cleaning actually works
- When negative pressure cleaning makes sense, and when it doesn’t
- Risks and material limits you should know before booking
- The standards and verification steps worth asking about
- What a professional cleaning visit should look like
- What research and major health agencies actually say
- Setting realistic expectations for your own system
- Get an inspection before you book anything
- Where to verify the standards and guidance yourself
- Sources
- FAQ
How negative pressure duct cleaning actually works
The process starts with sealing the system. Technicians cover supply and return registers, then connect a high powered vacuum collection unit to an access point cut into the main trunk line. That vacuum pulls air continuously through the ducts, creating negative pressure that draws loosened particles toward the collection point instead of letting them drift into the living space.
While the vacuum runs, technicians use agitation tools such as whips, brushes, or air compressors to knock debris off duct walls. Agitation alone just stirs up dust, and vacuum suction alone misses anything stuck to the surface. Together, they define what the industry calls source removal, the standard against which other methods are judged.
The sequence typically looks like this:
- Seal registers and isolate the system section being cleaned.
- Cut a service opening and connect the HEPA-filtered vacuum collection unit.
- Agitate duct surfaces zone by zone while the vacuum maintains continuous negative pressure.
- Capture all loosened material through HEPA filtration or safe outdoor exhaust, well clear of windows and intakes.
HEPA filtration or exhaust placement matters because a vacuum without proper filtering can push fine particles back into the air it’s supposed to be cleaning.
Pro Tip: Ask whether the collection unit exhausts outdoors or through HEPA filters indoors, and where the exhaust point sits relative to windows and air intakes.
When negative pressure cleaning makes sense, and when it doesn’t
This method earns its cost when there’s a documented problem, not as routine maintenance. It’s appropriate for:
- Visible mold growth inside ducts or on nearby surfaces.
- Water intrusion or moisture damage that has reached the duct system.
- Heavy soot, fire residue, or construction debris inside the ductwork.
- Commercial systems with trunk line contamination that’s hard to access with simple tools.
It’s usually unnecessary when there’s no visible contamination, when dust is limited to a grille or two, or when the real complaint is just general housekeeping dust in the home. In those cases, other targeted services fit better: coil cleaning for a dirty evaporator coil, rod cleaning for a clogged dryer vent, or degreasing for kitchen exhaust hoods. Matching the method to the actual problem avoids paying for a bigger job than the situation calls for.
Risks and material limits you should know before booking
Negative pressure isn’t harmless to every duct type. Flexible ducting can collapse or tear if the applied pressure exceeds its manufacturer tolerance, and industry reporting notes that tolerances vary widely between products. Fibreglass-lined ducts present a different problem: aggressive agitation can damage the liner itself, sometimes to the point where replacement is more practical than cleaning.
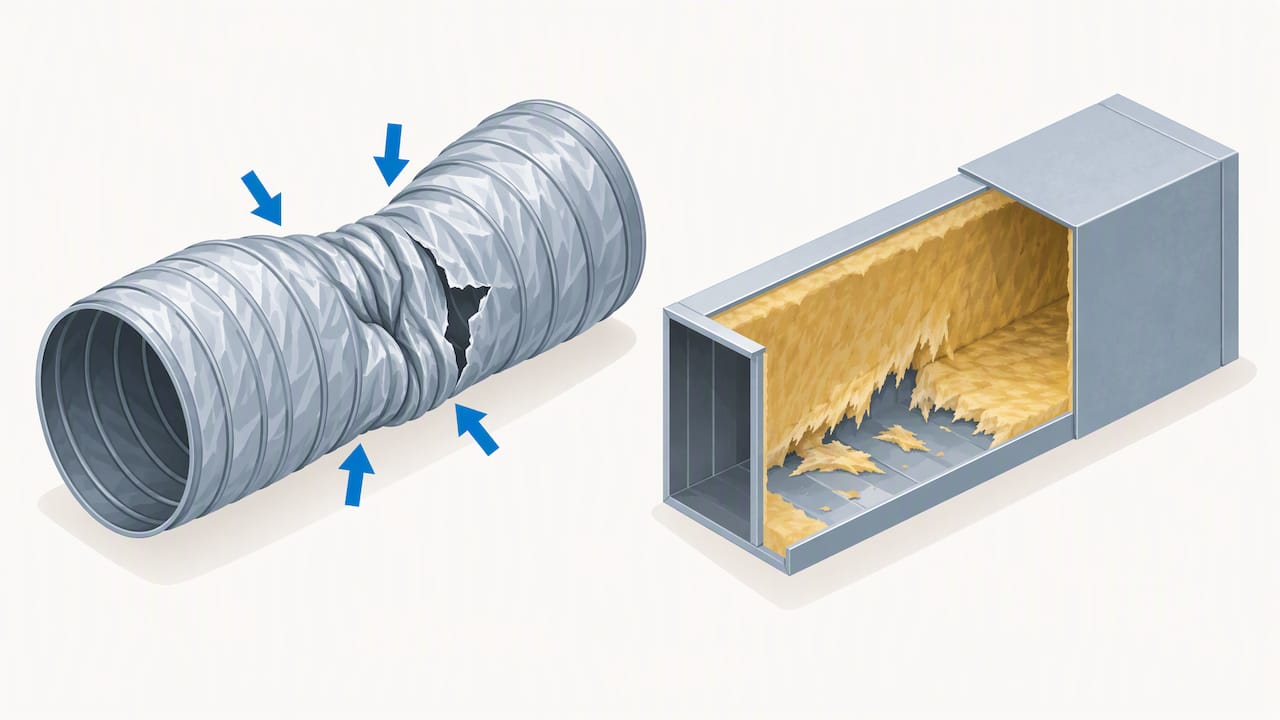
If containment fails, cleaning can temporarily raise airborne particle counts rather than lower them, according to a National Research Council Canada review, which found that outcomes depend heavily on how well the job is executed.
Reputable contractors manage these risks by:
- Assessing duct material and condition before choosing a tool or pressure setting.
- Using lower pressure or hand cleaning methods on flex duct sections.
- Recommending removal or replacement when a liner or flex section is too degraded to clean safely.
The standards and verification steps worth asking about
The industry’s reference point is the NADCA ACR standard, which defines negative duct pressurization and sets requirements for verification and HEPA-filtered collection or safe outdoor discharge during cleaning. Asking a contractor whether they follow this standard, by name, is a fast way to separate a properly run job from a shortcut version.
A thorough scope of work should include:
- Continuous negative pressure maintained throughout the cleaning, not just at the start.
- HEPA-filtered collection drums or exhaust routed well away from windows, doors, and air intakes.
- Representative pressure differential checks at multiple points in the system.
- Backup equipment or a response plan in case the primary vacuum unit fails mid-job.
- Documentation showing cleanliness verification once the work is done.
Mechanical agitation combined with continuous negative pressure and HEPA capture is what defines effective source removal, and cleaning ducts alone while ignoring coils, blowers, and dampers invites recontamination.
NADCA, Proper Cleaning Methods
That last point matters: a crew that only touches the ducts and skips the blower and coils is leaving half the contamination source in place.
What a professional cleaning visit should look like
A properly run job follows a predictable sequence, and knowing it helps you spot a crew that’s cutting corners.
- The technician inspects the system first and provides a written scope describing what will be cleaned and how.
- Service openings are cut at specific points, used for equipment access, and resealed properly once the work is finished, not left loose or patched with tape.
- Registers stay sealed throughout, and portable air scrubbers may run in occupied spaces during the job.
- The crew works zone by zone, agitating and vacuuming each section under continuous negative pressure with HEPA collection.
- Once finished, they check for remaining debris and document the result.
- Collected waste is bagged and removed, and you should receive a summary of what was found and cleaned.
Pro Tip: Ask to see the resealed service openings before the crew leaves. A rushed reseal is one of the easiest shortcuts to spot and one of the most common sources of air leakage afterward.
What research and major health agencies actually say
The evidence here is more conditional than marketing claims often suggest. The NRC Canada review found insufficient proof that routine duct cleaning consistently improves indoor air quality, with results hinging on procedure and containment.
The EPA’s guidance lines up with that caution: it does not recommend duct cleaning on a routine schedule, only when contamination is visible, and it warns that inadequate vacuum collection can raise indoor particle levels rather than lower them. It also urges care with biocides and sealants used inside ducts.
- The EPA recommends cleaning as needed for visible contamination, not on a fixed schedule.
- NADCA’s position is that source removal with verified containment is what prevents recontamination.
The practical takeaway: ask for documented verification, and be skeptical of anyone promising duct cleaning as a general health fix rather than a targeted fix for a specific, visible problem. For more on how dirty ducts affect health and comfort, see our piece on winter air quality issues.
Setting realistic expectations for your own system
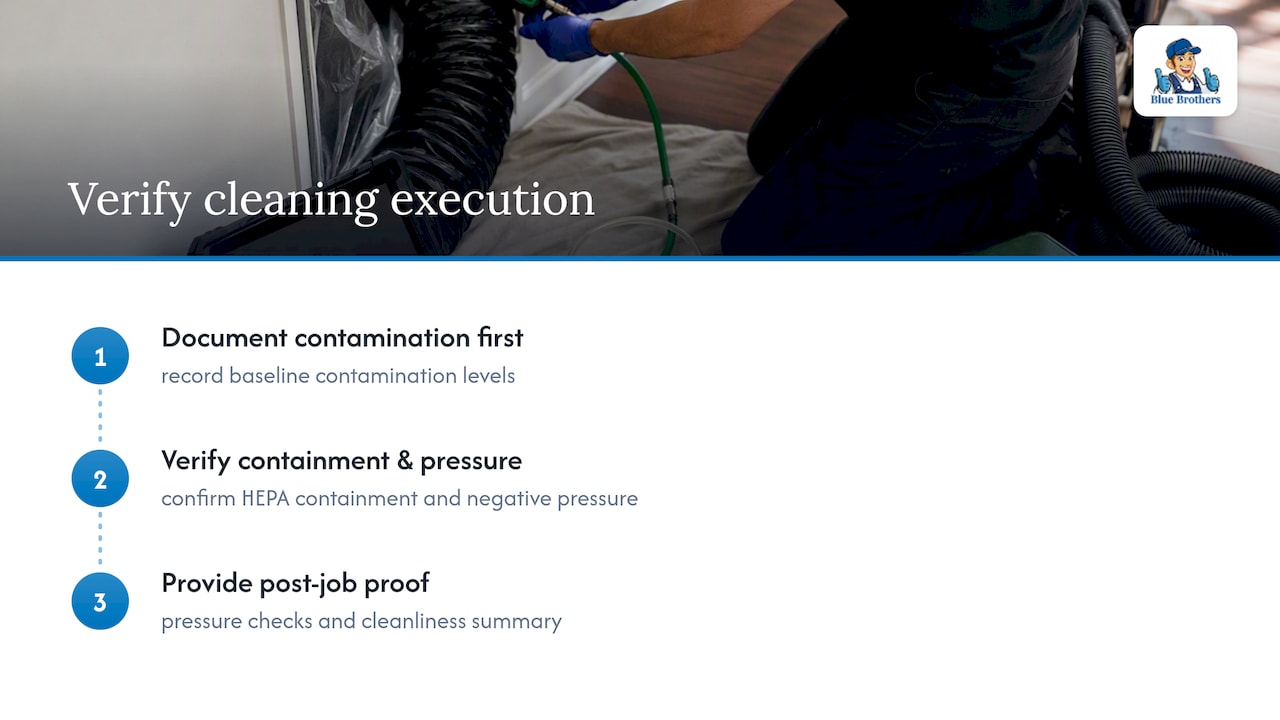
The standards exist for a reason: a cleaning job without verified negative pressure and proper HEPA containment is a gamble, not a guarantee. We’ve seen that the difference between a job that improves air quality and one that just stirs up dust comes down to execution, not equipment specs on a brochure.
Improvements are real when contamination is documented beforehand and containment is verified during the work, not assumed. If a contractor can’t show you pressure checks or a cleanliness summary afterward, you have no way to know whether the job actually removed anything or just moved it around. Ask for the paperwork every time.
— Jayce
Get an inspection before you book anything
A free inspection tells you whether your ducts actually need source removal cleaning or something smaller, like a coil clean or a dryer vent service, before you commit to either. The company follows NADCA-aligned procedures, including HEPA collection and properly resealed service openings, on both residential and commercial jobs.
- Request a quote through the air duct cleaning page for residential or commercial systems.
- Ask about related services like dryer vent cleaning or coil cleaning if your inspection points to a narrower problem.
- Facility managers handling larger trunk systems can review our commercial duct cleaning services for scope and scheduling details.
Book an inspection and you’ll know exactly what’s in your ducts and what it will take to deal with it properly.
Where to verify the standards and guidance yourself
The NADCA ACR standard sets procedural requirements for source removal cleaning. The EPA’s duct cleaning guidance covers when cleaning is appropriate. The NRC Canada review examines the evidence behind air quality claims. Engineering background on ventilation and containment design is available through RKL Projekt.
Sources
- National Research Council Canada review on duct cleaning (2010)
- Should you have the air ducts in your home cleaned? | EPA
- Proper cleaning methods | NADCA
FAQ
What are the downsides to air duct cleaning?
The main downside is that a poorly contained job can temporarily raise airborne particle levels instead of lowering them, particularly if the vacuum collection isn’t HEPA-filtered or properly sealed. Flexible or fibreglass-lined ducts can also be damaged by excessive agitation or pressure if a technician doesn’t assess the material first.
What is a good negative air machine for air duct cleaning?
The right equipment is a vacuum collection unit that maintains continuous negative pressure and filters captured air through HEPA filtration or exhausts it safely outdoors, away from windows and intakes. The NADCA ACR standard sets out the performance requirements these machines need to meet during a source removal job.
Does cleaning air ducts really make a difference?
It can, but only when there’s documented contamination and the job follows proper containment and verification steps. A National Research Council Canada review found the evidence for routine cleaning improving air quality is limited, with results depending heavily on execution quality.
What are signs your air ducts need cleaning?
Visible mold growth, water damage near or inside the ductwork, and heavy soot or construction debris are the clearest signs that cleaning is warranted. The EPA recommends cleaning when contamination is visible rather than on a fixed schedule, so general dust alone usually isn’t a strong enough reason on its own.