Most roof-terminated dryer vents can be cleared from inside the house using a flexible rod brush kit, and that clears the majority of blockages without ever touching a ladder. Do that first. Call a certified technician if airflow stays weak after cleaning, if the roof cap looks damaged or sealed shut, or if you smell burning while the dryer runs, since that last sign means stop the dryer immediately and get it inspected.
TL;DR:
- Most roof-terminated dryer vents can be effectively cleaned from inside the house with a flexible rod brush kit, avoiding the need for rooftop access unless the cap is damaged or blocked.
- Annually inspecting and cleaning longer or heavily used duct runs, especially with flexible or multiple elbows, reduces fire risk and maintains airflow efficiency.
- Signs such as persistent poor airflow, overheating, or a burning smell should prompt an immediate professional inspection, particularly if the dryer is gas-powered or the roof cap appears compromised.
- Replacing flexible foil or plastic ducts with rigid metal reduces lint buildup and prevents crimps that cause frequent clogs, especially in long or convoluted runs.
- Professional services are advisable when duct runs exceed 20 feet, have multiple elbows, or when interior cleaning fails to restore proper airflow or when roof cap issues are suspected.
Table of Contents
- Why roof-terminated dryer vents carry higher fire risk
- How often should you clean a rooftop dryer vent?
- Cleaning a roof-terminated dryer vent from inside: step by step
- What tools do you actually need for interior vent cleaning?
- Should you replace flexible ductwork instead of just cleaning it?
- When does rooftop access become necessary?
- Do you need to hire a professional for your rooftop vent?
- How Blue Brothers handles rooftop dryer vent jobs
- Weighing DIY against scheduled professional care
- Book a rooftop dryer vent inspection with Blue Brothers
- Sources
- FAQ
Why roof-terminated dryer vents carry higher fire risk
A dryer vent clogged with lint is one of the more preventable fire hazards in a home, and the risk climbs faster on roof-terminated systems because the exhaust travels farther, through more turns, before it ever reaches open air. Lint stalls at every bend and settles at the high points, exactly where a homeowner is least likely to check. Reduced airflow forces the dryer to run hotter and longer to dry the same load, and that heat has nowhere obvious to go in a vent packed with fibre.
Gas dryers raise the stakes further. A blocked or partially blocked vent on a gas unit can push combustion byproducts, including carbon monoxide, back into the exhaust path instead of clearing them outdoors. That is a different category of risk than a simple lint fire, and it is one reason gas-dryer households should never let a sluggish drying cycle go uninvestigated.
Roof penetrations also invite moisture and wildlife problems that flat vents rarely see. Condensation can build inside a poorly insulated run and drip back toward the attic, while birds, squirrels, and wasps treat an unguarded roof cap as prime real estate. Either problem rots framing or blocks airflow long before anyone notices a fire risk forming.
Watch for these warning signs that the vent needs attention now, not at the next annual check:
- Clothes take noticeably longer to dry, or come out still damp on a normal cycle
- The dryer, its exhaust duct, or the wall around it feels hot to the touch
- You smell a burning or musty odour during or after a cycle
- Lint collects visibly around the outdoor cap opening
- The laundry room feels unusually humid or smells of mildew after drying
Pro Tip: If you ever catch a scorched smell mid-cycle, shut the dryer off at the outlet or breaker before you do anything else. Diagnose it once the machine is powered down, never while it’s still running.
How often should you clean a rooftop dryer vent?
Once a year is the baseline for inspecting and cleaning roof-terminated dryer vents, and that interval assumes a typical household running a handful of loads a week through a reasonably short, straight duct run.
More frequent cleaning may be needed for heavy use, long duct runs, or homes with shedding pets:
- Households doing daily laundry, large families, or short-term rental turnover with heavy dryer use
- Long duct runs, roughly 20 feet or more, especially with several 90 degree elbows
- Homes with pets that shed heavily, since pet hair compounds lint buildup fast
- Older flexible ductwork that traps lint more readily than smooth metal
Beyond the calendar, certain events should trigger an unscheduled check regardless of when the last one happened: new tenants or owners moving in without vent history, any renovation that touched the laundry room or roofline, or a dryer that suddenly takes longer to finish a load than it used to. Any one of those is a cue to look at the vent before the next scheduled date rolls around.
Cleaning a roof-terminated dryer vent from inside: step by step
Interior cleaning handles the overwhelming majority of rooftop vent blockages, and most roof-terminated vents can be effectively cleared from inside using a flexible rod brush kit, with rooftop access reserved for cases where the cap itself is blocked or damaged. Here is the sequence that works for a standard residential setup.
1. Cut power and pull the dryer away from the wall.
Unplug an electric dryer or shut off the gas supply valve to a gas unit before touching anything. Slide the dryer forward enough to reach the exhaust connection comfortably, and take a look at what kind of hose is attached. Thin foil or plastic accordion ducting is worth noting now, because it factors into a decision later in this guide.
2. Disconnect the duct and vacuum both ends.
Loosen the clamp or tape holding the duct to the dryer’s exhaust port and separate the two. Vacuum the dryer’s outlet and the wall-side duct opening with a shop vac and a narrow attachment. This first pass removes the loose surface lint that would otherwise just get pushed deeper into the line.
3. Feed a flexible rod brush kit into the wall duct.
Attach the first rod segment to a rotating brush head, connect it to a cordless drill on a low speed setting, and feed it slowly into the duct opening. Add rod segments as you go, letting the drill spin the brush rather than forcing it forward. When you hit a bend, work it through gently rather than ramming the rod against resistance.
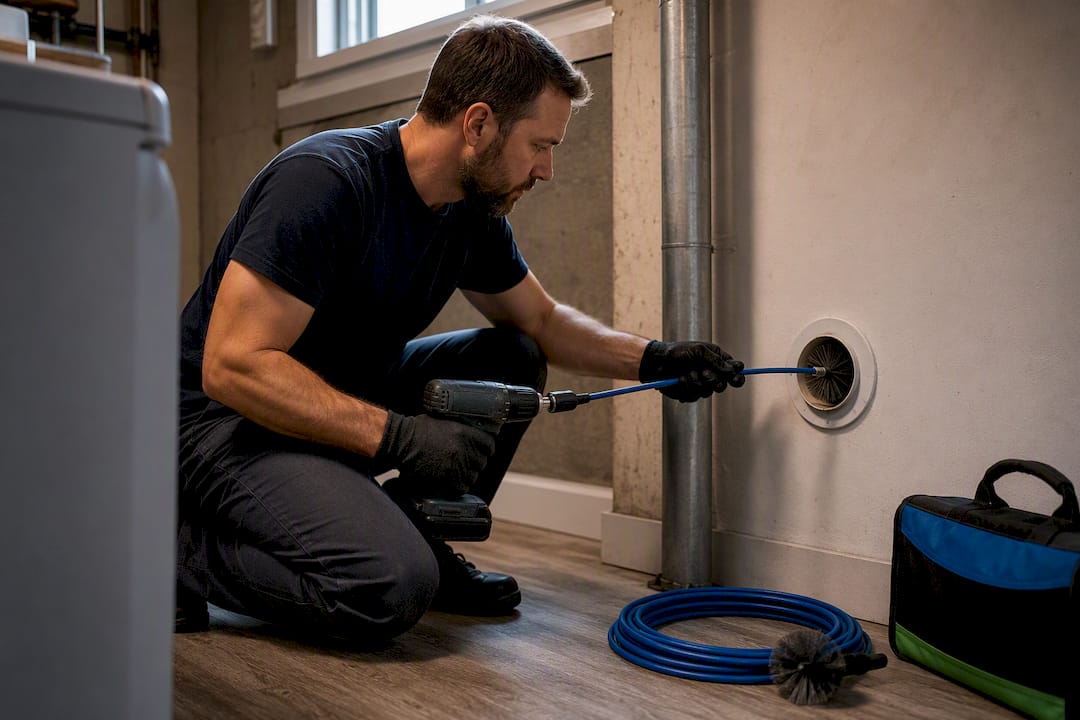
4. Work the brush back and forth through each section, several passes minimum.
Lint tends to collect at elbows and at the highest points of a roof-terminated run, so a single pass rarely clears everything. Pull the brush back toward the laundry room repeatedly, drawing loosened lint back with it rather than pushing it further up the line, which tends to work better than pushing debris toward the roof.
5. Vacuum the duct interior again once the rod work is done.
Run the shop vac hose as far into the duct as it will reach to pull out everything the brush knocked loose. This step matters more than it sounds. Skipping it just leaves a fresh pile of lint sitting partway down the run, waiting to reform a clog within a few cycles.
6. Reconnect everything and run an empty test cycle on high heat.
Reattach the duct to the dryer with a new clamp if the old one looks worn, then run one empty load on the hottest, longest setting the machine has. Feel for strong, steady airflow at the roof cap if you can safely observe it, or have someone check from a window. Weak or absent airflow after this test is your signal that the blockage sits further up the line than interior rods reached.
A typical job like this, for a run under about 20 feet with fewer than two 90 degree elbows, takes 30 to 45 minutes start to finish. Longer or more convoluted runs take longer and increase the odds you’ll need rooftop follow up.
Stop and call a professional if you hit hard resistance the brush cannot pass, if the test cycle still shows poor airflow, or if you find signs of animal nesting partway through the duct. Forcing a rod past genuine resistance risks tearing the duct or pushing a rigid obstruction further into an inaccessible section.
What tools do you actually need for interior vent cleaning?
A flexible rod brush kit rated for the length of your specific duct run is the core purchase, and kit capacity matters more than most people expect. A kit sold for a 12 foot run will simply run out of rod before it reaches a roof cap on a 25 foot vertical stack, leaving the far end of the duct untouched no matter how well you use it.
Beyond the rod kit, a practical setup includes:
- A cordless drill to spin the rotating brush head, saving your arms from doing all the work by hand
- A shop vac with a narrow hose attachment for pulling loose lint out before and after brushing
- Work gloves and safety glasses, since dislodged lint and dust get into everything nearby
- A new duct clamp or two, in case the original hardware is brittle or corroded on removal
- A flashlight or phone light to check the wall opening and dryer port for visible buildup
Rod diameter matters as much as length. A brush too narrow for the duct diameter misses lint along the walls, while one that’s too large can jam in tighter bends common on roof-routed runs. Match the kit to your actual duct size before buying, not after.
Run through a short checklist before you start and again once you finish: confirm the duct material and its condition, check that the damper flap at the exterior cap moves freely rather than sticking shut, and finish with that high-heat airflow test. Those three checks catch most of the problems a rod and brush alone can miss.
Should you replace flexible ductwork instead of just cleaning it?
Foil and plastic accordion-style ducting is the single most common reason a rooftop vent clogs faster than it should. The ridged, corrugated interior of that material snags lint at every ripple, and the material crimps easily at bends, creating narrow chokepoints that a brush can pass through but that airflow struggles with every single cycle.
Rigid or semi-rigid smooth-wall metal duct solves both problems at once. Lint has far fewer surfaces to catch on, and metal duct holds its shape at bends instead of collapsing into a pinch point over time. Replacing older flexible ducting with smooth-wall metal is a safety upgrade, not a cosmetic one, since it directly reduces how often lint reaccumulates and how much heat builds up behind a partial blockage.
Consider replacement, not just cleaning, when any of the following show up during a service visit:
- The existing duct is foil or plastic accordion style rather than rigid or semi-rigid metal
- You find crimped or crushed sections that restrict airflow even after cleaning
- The duct run has more elbows than necessary, a sign it was installed for convenience rather than airflow
- Cleaning restores airflow only temporarily, with symptoms returning within a few months
A shorter, straighter run in smooth metal, with the fewest 90 degree elbows the layout allows, keeps both compliance and airflow performance easier to maintain going forward.
When does rooftop access become necessary?
Interior cleaning fails to restore airflow in a meaningful share of cases, and when it does, the problem almost always sits at the roof cap itself. Persistent low airflow after a thorough interior clean points to a blockage at the cap or a disconnected duct joint, which requires either a rooftop inspection or a professional camera inspection to confirm.
Common cap-level problems include:
- Bird or squirrel nests built inside or around the cap opening
- Caulking or sealant that has hardened over the cap, restricting the flapper’s movement
- A broken or rusted-shut damper flap that no longer opens under normal airflow pressure
- Physical damage to the cap itself from weather, ice, or age
Removing and resealing a roof cap can require roofing-specific expertise to avoid damaging shingles or flashing around the penetration. A cap pried off carelessly, or resealed with the wrong sealant, can create a leak point that costs far more to fix than the original clog ever would have. It is also important to recognize that climbing onto a roof carries real fall risk, particularly on steep pitches, wet shingles, or tile roofing that cracks under foot traffic.
Pro Tip: If you can’t get a clear, safe view of your roof cap from a ladder at the eaves, don’t guess at its condition from the ground. A quick camera inspection tells you in minutes whether the problem is nesting, a stuck damper, or something a rod kit already fixed.
If rooftop access isn’t something you can do safely yourself, the interior test cycle described earlier is still worth running. It tells a technician exactly what they’re dealing with before they ever get on the roof.
Do you need to hire a professional for your rooftop vent?
A handful of situations point clearly toward hiring a technician rather than continuing to troubleshoot on your own:
- Duct runs longer than about 20 feet, or with more than two 90 degree elbows
- No improvement in airflow after a complete interior cleaning and test cycle
- A gas dryer showing any sign of poor venting, given the carbon monoxide risk
- A roof cap that appears blocked, damaged, or inaccessible from a ladder
When hiring a technician, inquire about camera inspection, insurance, and duct replacement services. Costs vary with access difficulty, duct length, and any required repairs, so obtain a detailed quote before booking.
How Blue Brothers handles rooftop dryer vent jobs
Certified technicians can handle dryer vent jobs for various residential and commercial properties, from single-family homes to multi-unit strata portfolios. A typical visit starts with an inspection of the current duct material and condition, often backed by a camera check when interior cleaning alone doesn’t resolve airflow problems.
From there, technicians clean the full run, address the roof cap directly when it’s the source of the blockage, and recommend duct replacement when the existing material, usually older flexible ducting, is working against you rather than for you. Property managers overseeing multiple units can arrange scheduled service through strata dryer vent cleaning rather than reacting unit by unit.
Weighing DIY against scheduled professional care
Interior cleaning with a rod kit is genuinely worth doing yourself if your run is short, your ducting is in decent shape, and you’re comfortable with basic tools. Where DIY stops making sense is anything involving a ladder on a steep roof, a gas dryer showing venting problems, or a duct run long enough that a consumer rod kit simply can’t reach the far end.
Property managers, in particular, should default to scheduled professional maintenance rather than reactive fixes. A missed vent fire in a multi-unit building carries liability that dwarfs the cost of an annual service contract, and periodic inspections tend to catch duct degradation, like crimped flexible hose, long before it becomes a hire-a-professional emergency.
— Jayce
Book a rooftop dryer vent inspection with Blue Brothers
Blue Brothers is the practical alternative to guessing whether your rooftop vent still needs a ladder and a roofer. Certified technicians handle the interior cleaning, camera-check the roof cap when airflow doesn’t improve, and can replace crimped flexible ducting with smooth-wall metal in the same visit instead of sending you back to square one next season.

If your dryer is running long cycles or you simply haven’t had the vent checked this year, request a free quote for dryer vent cleaning and get a technician scheduled before lint buildup turns into a bigger repair. Homeowners can also review the full scope of the residential dryer vent cleaning service before booking, including what a standard visit covers and how cap or duct issues get handled on site.
Sources
The method, frequency, and material recommendations here draw from the New England Metal Roof maintenance guide for duct upgrades and inspection intervals, the FilterBuy HVAC resource for interior cleaning technique and hire thresholds, WikiHow’s step-by-step guide for method and rooftop safety, and Nelson Contracting’s roofing guidance on cap removal and resealing.
- Dryer Vent On Roof: Comprehensive Guide For Installation, Maintenance, And Safety – New England Metal Roof
- How to Clean a Dryer Vent on the Roof: 14 Steps (with Pictures) — WikiHow
- How to Clean the Dryer Vent on the Roof (It’s a Fire Hazard) — Nelson Contracting LLC
FAQ
How often should you clean a dryer vent on a roof?
At least once a year for most households, and twice a year for heavy laundry use, long duct runs, or homes with shedding pets.
My roof dryer vent is clogged. How can I clean it?
Disconnect the duct at the dryer, vacuum both ends, then feed a flexible rod brush kit through the duct with a cordless drill, working it back and forth through every bend before vacuuming again and running a high-heat test cycle to confirm airflow.
What is the typical cost for dryer vent cleaning?
Cost depends mainly on duct length, roof access difficulty, and whether cap repair or duct replacement is needed, so ask for a quote that accounts for all three rather than a flat number over the phone.
Is it safe to run a dryer vent through the roof?
Yes, when the duct is properly sized, the roof cap’s damper moves freely, and the system gets inspected annually. Roof-terminated runs carry more fire and moisture risk than short wall vents simply because lint has farther to travel and more elbows to collect at.